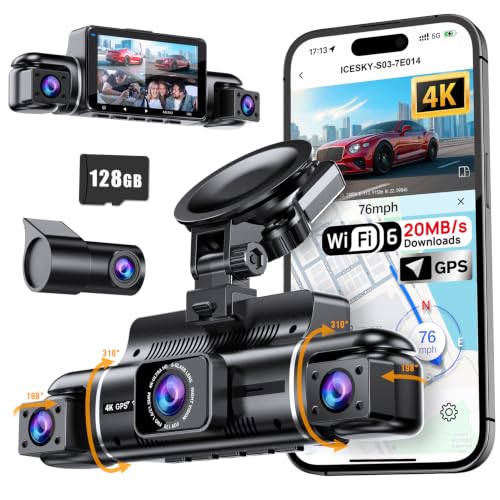
Understanding how to install dash cam: the complete step-by-step guide for any car sizing & specs checklist is essential for ensuring both optimal video coverage and vehicle electrical safety.
This guide is designed for automotive enthusiasts and everyday drivers who want to install a camera system without professional assistance. We assume a beginner to intermediate skill level, focusing on tools typically found in a home garage.
By the end of this guide, you will be able to mount a unit securely, route cables hidden from sight, and connect your device to a power source that prevents battery drain.
- Tools required for professional installation
- Step-by-step mounting and alignment techniques
- Cable routing behind interior trim panels
- Choosing between cigarette lighter and hardwire kits
- Testing connectivity and system settings
Overview & Prerequisites

Required Tools and Equipment
Before beginning, gather a trim removal tool, a roll of automotive-grade adhesive tape, wire ties, and a multimeter if you are performing a hardwire installation. Refer to Fitcamx Reviews: Top Dash Cam Picks 2026 to ensure your hardware is compatible with your vehicle's voltage system.
Defining Your Installation Scope
Determine if you need a simple plug-and-play setup or a 24 hour car security camera: The Ultimate Guide to Protecting Your Vehicle, which requires constant power. Understanding your car's trim design is crucial for hiding wires effectively.
Always clean the windshield surface with isopropyl alcohol before applying any adhesive mounts to ensure a long-lasting bond.
Core Concepts & Fundamentals

Understanding Power Management
The primary electrical concern is how the dash cam draws power. Most units use the 12V cigarette lighter, but hardwiring allows for cleaner aesthetics and parking surveillance. Improper power connection can trigger fault codes in modern vehicle computer systems.
The Geometry of Field of View
A camera mounted too high or too far to the side will create blind spots. Aligning the lens so that the center of the hood is just visible in the bottom frame ensures that you capture critical details like license plates without excessive sky interference.
| Feature | Correct Approach | Incorrect Approach |
|---|---|---|
| Mounting | Clean glass, center-high | Dirty glass, offset mounting |
| Wiring | Hidden behind headliner | Dangling across dashboard |
| Power | Hardwired to fuse box | Always-on cigarette port |
For more complex setups, such as using a car with camera on roof: Everything You Need to Know About 360-Degree Vehicle Tech, consult professional guidance for external routing.
Step-by-Step Execution Guide

Preparation and Placement Phase
Select your mounting location first. Ensure the camera does not obstruct your line of sight or interfere with rain sensors. Power on the device while held in place to verify the viewing angle on the camera's display or mobile app.
Routing and Connection Phase
Use trim removal tools to tuck cables neatly into the A-pillar and headliner. Avoid crossing airbag deployment zones; always route behind or under these components to prevent interference during a safety deployment.
Recommended Equipment & Solution

ROVE R2-4K Dual Dash Cam User Guide
A reliable pick for ROVE R2-4K Dual Dash Cam, selected based on this article's guidance.

How to Install a Wall-Mounted Television
A reliable pick for How to Install a Wall-Mounted, selected based on this article's guidance.
Best Practices & Pro Tips

Optimizing Video Storage
Use high-endurance microSD cards designed for dash cam write cycles. Standard cards often fail prematurely due to the constant overwriting of loop recording files.
Routine Maintenance
Perform a test check every three months to verify that the camera is actually recording and that the date/time stamp is synchronized. Refer to Pelsee S12 Pro 4k Mirror Dash Cam Review: 2026 Updated Guide for tips on high-resolution file management.
Troubleshooting & Common Pitfalls

Power-Related Issues
If your camera reboots randomly, check your fuse tap connection. Loose taps or poor ground contacts are the primary culprits for intermittent power delivery.
Software and Recording Failures
If the device displays an "SD Card Error," the card may have reached its write-life limit. Always check 7 Common Problems with How to Install Dash Cam: The Complete Step-by-Step Guide for Any Car (and Quick Fixes) before assuming the hardware is defective.
Frequently Asked Questions
Q: Can I install a dash cam myself?
A: Yes, most dash cam installations are straightforward and require only basic tools like a trim removal tool and a screwdriver.
Q: Will this void my car's warranty?
A: Generally, simple plug-in installations do not void warranties, but check your vehicle manual if you are hardwiring into the fuse box.
Q: Where is the best place to mount the camera?
A: The best location is behind the rearview mirror, which keeps the unit out of your direct field of vision.
Q: How do I hide the wires?
A: Use a plastic trim removal tool to gently pry open the edges of your headliner and A-pillar trim to tuck the cables inside.
Q: Is hardwiring necessary?
A: It is recommended if you want a clean interior look or if you plan to use parking mode features that require constant power.
Q: How long does a typical installation take?
A: An experienced installer can complete the job in 30 minutes, while first-timers should allow for 1 to 2 hours.
Q: Do I need a professional?
A: Only if you are uncomfortable working with automotive electronics or have a luxury vehicle with complex onboard sensors.
Q: What should I do if the adhesive fails?
A: Use high-quality 3M automotive double-sided tape, which is designed to withstand the extreme temperature variations inside a vehicle.
Key Takeaways
- 1 Always clean glass surfaces thoroughly before mounting.
- 2 Route cables behind airbags, not across them.
- 3 Use high-endurance SD cards for reliability.
- 4 Test the camera's angle via mobile app before permanent mounting.
- 5 Secure the ground wire to a clean, unpainted chassis point.
- 6 Format your memory card periodically to prevent errors.
- 7 Check for firmware updates at least once per year.
Conclusion
Installing a dash cam is a manageable project that significantly increases your vehicle's safety profile. By following this methodical approach, you ensure a secure mount and reliable operation for years to come.
Remember that the quality of your installation is just as important as the quality of the device itself. A well-hidden wire and a solid mount mean your camera stays put when you need it most.
Take your time with the routing process; a clean installation is a mark of a job well done.
📌 Pillar Resource: Read our complete our How to Install Dash Cam: The Complete Step-by-Step Guide for Any Car resource for in-depth insights.